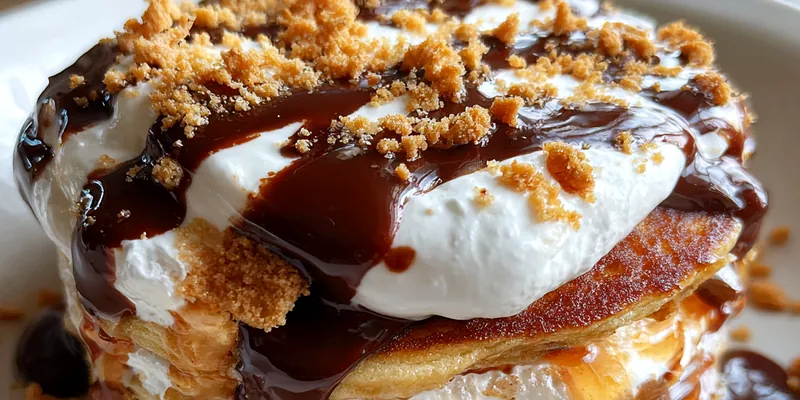
Decadent Chocolate Pancakes
If you’re in the mood for a breakfast that feels like a treat, these Decadent Chocolate Pancakes are the perfect choice. With a rich chocolate flavor and fluffy texture, they are sure to delight both kids and adults. Their ease of preparation makes them a favorite for family brunches or special occasions. Top them with whipped cream and berries for an extra indulgent experience.

Why This Decadent Chocolate Pancakes Recipe Works
This recipe stands out due to its rich chocolate flavor balanced with light and fluffy pancake texture. The combination of cocoa powder and chocolate chips creates a delightful experience in every bite. Additionally, using buttermilk adds acidity which helps tenderize the pancakes, making them incredibly moist. This means that even those who might be skeptical about chocolate pancakes will find these irresistible.
The technique of mixing wet and dry ingredients separately ensures a light batter and prevents overmixing, which can lead to dense pancakes. By allowing the batter to rest slightly, you also give the gluten time to relax, resulting in a tender pancake. These small but effective methods contribute to the perfect texture and flavor profile, making your breakfast a hit.
💡 Professional Tip
For the best results, let your pancake batter rest for about 10 minutes before cooking. This resting period allows the flour to hydrate, leading to a lighter, fluffier texture. Also, ensure your pan is at the right temperature before you start cooking; if it's too hot, the pancakes may burn on the outside while remaining raw inside.
Frequently Asked Questions
Yes, you can make these pancakes ahead of time and reheat them later. To do this, cook the pancakes as instructed, allow them to cool, and store them in an airtight container in the refrigerator for up to three days. When ready to eat, simply reheat them in the microwave or on a skillet over low heat until warmed through.
If you don’t have buttermilk on hand, you can make a simple substitute by mixing 1 cup of milk with 1 tablespoon of lemon juice or white vinegar. Let it sit for about 5-10 minutes until it thickens slightly. This will give you a similar acidity and moisture level that buttermilk provides in the recipe.
You’ll know the pancakes are done when they are golden brown on both sides and spring back slightly when pressed. Look for bubbles forming on the surface of the batter; when they begin to pop, it’s a good indication that it’s time to flip. Avoid cooking them too long on one side to prevent burning.
Absolutely! You can freeze these pancakes for up to two months. To do this, allow the pancakes to cool completely, then stack them with parchment paper between each pancake to prevent sticking. Place the stack in a freezer-safe bag or airtight container. When ready to enjoy, just reheat them directly from the freezer in the toaster or microwave.
These pancakes are delicious on their own, but you can elevate the experience by serving them with whipped cream, fresh berries, and a drizzle of maple syrup. For an extra special touch, consider adding a scoop of vanilla ice cream or a sprinkle of powdered sugar for presentation.
When stored properly in an airtight container, these pancakes can last in the refrigerator for up to three days. Make sure they are completely cooled before sealing them to avoid moisture buildup, which can make them soggy.
Yes, you can prepare the batter ahead of time. Store the mixed batter in the refrigerator for up to 24 hours. Just give it a gentle stir before cooking, as it may thicken slightly. This allows for convenient meal prep and makes it easy to whip up a delicious breakfast in no time.
The best way to reheat pancakes is either in the microwave or on a skillet. For the microwave, place them on a plate and cover with a damp paper towel to keep them moist; heat in 30-second intervals until warm. For the skillet, heat it on low and lightly grease, then warm the pancakes for a minute or two on each side until heated through.
Recipe Troubleshooting Guide
Too Dry
Problem: If your pancakes turn out too dry, it could be due to overmixing the batter or cooking them too long.
Solution: To prevent this, mix the ingredients gently until just combined and ensure you remove them from the heat as soon as they are golden brown.
Not Crispy Enough
Problem: Pancakes that are not crispy enough may not have been cooked at a high enough temperature.
Solution: Make sure your skillet is hot enough before adding the batter and consider cooking them a bit longer to achieve that perfect crispiness on the edges.
Overcooked
Problem: Overcooked pancakes can become tough and dry, losing their fluffy texture.
Prevention: To avoid overcooking, monitor your cooking time closely, and adjust the heat as needed. Remember, pancakes cook quickly, so err on the side of undercooking than overcooking.
Undercooked Center
Problem: If the center of your pancakes is undercooked, they may still be gooey or wet.
Recovery: To recover from this, simply lower the heat and continue cooking the pancakes until the center is set. You can also cover them with a lid for a minute to help them cook through.
Burnt Exterior
Problem: Pancakes with a burnt exterior may result from cooking at too high of a temperature.
Prevention: Ensure your skillet is not too hot and adjust the heat as necessary, allowing for even cooking without burning.
Flavor Balance
Too Sweet: If the pancakes are too sweet, consider reducing the amount of sugar in the batter next time.
Too Salty: To balance out overly salty pancakes, serve them with a sweet topping like syrup or fruit to counteract the saltiness.
Bland: If they are bland, you might add a pinch more salt or some vanilla extract to enhance the overall flavor.

Essential Ingredients for Decadent Chocolate Pancakes
The key ingredients for these Decadent Chocolate Pancakes include all-purpose flour, unsweetened cocoa powder, and buttermilk. The flour provides the structure, while the cocoa powder adds the rich chocolate flavor that makes these pancakes truly decadent. Buttermilk not only adds moisture but also reacts with the baking powder to create a fluffy texture.
Using high-quality cocoa powder and chocolate chips is crucial; it makes a significant difference in flavor. Look for Dutch-processed cocoa for a smoother taste, and opt for semi-sweet or dark chocolate chips for an intensified chocolate experience. Fresh, high-quality ingredients will ensure that your pancakes are not just good but truly exceptional.
Essential Ingredient Notes
- All-Purpose Flour: Using all-purpose flour is essential for giving the pancakes their structure. Ensure it's properly measured—scooping directly from the bag can lead to using too much flour, resulting in dense pancakes. Spoon the flour into a measuring cup instead for accuracy.
- Cocoa Powder: Opt for unsweetened cocoa powder to control the sweetness of your pancakes. Quality matters; choose a cocoa powder that offers a rich, chocolatey flavor. If you want a deeper chocolate taste, consider using Dutch-processed cocoa for a smoother profile.
- Chocolate Chips: When selecting chocolate chips, go for semi-sweet or dark varieties for a richer flavor. They melt beautifully into the pancakes, creating pockets of chocolate goodness. Store your chocolate chips in a cool place to maintain freshness and ensure they are at room temperature before adding to the batter.

Step-by-Step Cooking Process
The cooking process for these Decadent Chocolate Pancakes is straightforward and satisfying. Start by mixing the dry ingredients in one bowl and wet ingredients in another, which helps create a light batter. Once combined, the key is not to overmix; a few lumps are okay. Allowing the batter to rest for a few minutes enhances the texture.
When cooking, ensure your skillet is preheated to the right temperature. Pour the batter into the skillet and watch for bubbles; this signals it's time to flip. Cook them just until golden brown for that perfect fluffy pancake. The result is a beautifully risen, chocolatey pancake that's sure to please.
Key Technique for Perfect Decadent Chocolate Pancakes
The most critical technique for achieving perfect Decadent Chocolate Pancakes is to avoid overmixing the batter. Overmixing can lead to tough pancakes, so combine the ingredients until just blended. Letting the batter rest before cooking allows the flour to hydrate and the gluten to relax, resulting in a tender pancake with a delightful texture.
Decadent Chocolate Pancakes
📋 Ingredients
Main Ingredients
- 1 cup butterRoom temperature
- 1 cup heavy creamFor drizzling
- 1/2 cup powdered sugarFor sweetness
- 1 teaspoon vanilla extractFor flavor
For the Sauce
- 1 cup all-purpose flourFor structure
- 1/2 cup unsweetened cocoa powderFor chocolate flavor
- 1/4 cup granulated sugarFor sweetness
- 2 tablespoons brown sugarFor moisture
- 2 teaspoons baking powderFor leavening
- 1/2 teaspoon baking sodaFor fluffiness
- 1/4 teaspoon saltTo balance flavor
- 1 1/2 cups buttermilkFor moisture
Instructions
Mix Dry Ingredients
In a large bowl, whisk together the flour, cocoa powder, granulated sugar, brown sugar, baking powder, baking soda, and salt.
Combine Wet Ingredients
In another bowl, mix the buttermilk, vegetable oil, vanilla extract, and eggs until well combined.
Combine Mixtures
Pour the wet mixture into the dry ingredients and mix until just combined. Do not overmix; a few lumps are okay.
Add Chocolate Chips
Gently fold in the chocolate chips.
Preheat Pan
Heat a non-stick skillet or griddle over medium heat and lightly grease with cooking spray or butter.
Cook Pancakes
Pour 1/4 cup of batter for each pancake onto the skillet. Cook until bubbles form on the surface, then flip and cook until golden brown.
Keep Warm
Transfer cooked pancakes to a plate and keep warm in an oven set to low heat while you cook the remaining batter.
Serve
Stack pancakes on plates, top with whipped cream, fresh berries, and drizzle with maple syrup.
Recipe Notes & Tips
Storage Tips
To store leftover pancakes, place them in an airtight container in the refrigerator where they will last for up to three days. For longer storage, freeze them as mentioned earlier. When reheating, sprinkle a few drops of water before microwaving to maintain moisture.
Serving Suggestions
These pancakes are best served fresh off the skillet, topped with whipped cream, fresh fruits, or a generous drizzle of maple syrup. For an added touch, sprinkle some chocolate shavings or nuts on top to enhance both flavor and presentation.
Recipe Variations
For a twist on this classic recipe, consider adding chopped nuts or swapping out the chocolate chips for white chocolate or peanut butter chips. You can also experiment with adding spices like cinnamon or espresso powder for an exciting flavor boost.