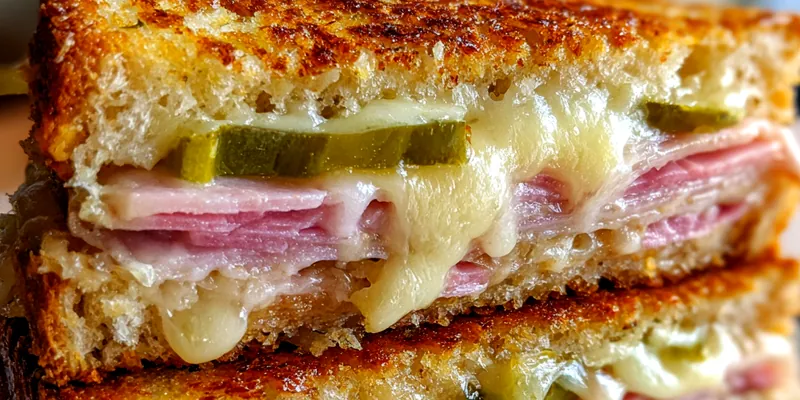
Crispy Grilled Ham Sandwich
The Crispy Grilled Ham Sandwich is a timeless favorite that combines savory ham with gooey cheese between two perfectly toasted slices of bread. It's quick to prepare and perfect for lunch or a satisfying snack. With a few simple ingredients and minimal effort, you can enjoy this classic American dish in no time. Whether you’re packing lunch for work or enjoying a lazy weekend at home, this recipe delivers deliciousness with every bite.

Why This Crispy Grilled Ham Sandwich Recipe Works
This recipe for Crispy Grilled Ham Sandwich stands out due to its simplicity and flavor. By using high-quality ingredients and the right technique, you can create a sandwich that is both crispy on the outside and gooey on the inside. The combination of ham and cheese is classic, and the addition of mustard and mayonnaise adds a delightful tang.
The technique of buttering the bread and cooking it slowly ensures an even crispiness. Covering the sandwich while it cooks helps to melt the cheese perfectly without burning the bread. This method guarantees a satisfying crunch with every bite, making it a stellar choice for any meal.
💡 Professional Tip
For an extra crispy sandwich, consider using a panini press instead of a skillet. This method not only browns the bread evenly but also compresses the sandwich, helping the cheese to melt perfectly. Additionally, using a mix of cheeses can add more depth of flavor.
Frequently Asked Questions
Yes, you can prepare the sandwiches in advance and store them in the refrigerator. However, for the best results, it's recommended to grill them just before serving to maintain the crispiness of the bread. If you must prepare them ahead, consider reheating them in a skillet to restore some of the crispy texture.
If you’re looking for a substitute for sliced ham, turkey or roast beef works well in this recipe. You can also try a vegetarian option such as roasted vegetables or a plant-based deli meat for a delicious alternative. Just remember to adjust the cooking time based on the ingredients used.
The sandwich is done when both sides are golden brown and crispy, and the cheese is melted. You can gently press down on the sandwich to check for firmness – it should feel crispy yet soft in the middle. Be careful not to overcook to avoid burning the bread.
While it's not recommended to freeze the entire sandwich because of the bread texture, you can freeze individual ingredients like ham and cheese. Assemble and grill the sandwich fresh, as this ensures the best taste and texture.
Pairs perfectly with a side of potato chips, a crisp salad, or a bowl of tomato soup for dipping. You can also serve it with pickles or a tangy coleslaw to add a crunch and additional flavor contrast.
The sandwich can last in the fridge for 2-3 days when stored in an airtight container. However, for the best taste, it’s advisable to consume it within the first 24 hours. Reheat it in a skillet for the best results when ready to eat.
Yes, you can assemble the sandwiches ahead of time and keep them in the refrigerator. To keep them fresh, wrap them tightly in plastic wrap or keep them in an airtight container. Grill them just before serving to ensure optimal crispiness.
The best way to reheat the sandwich is in a skillet over medium heat. Cover it with a lid to help melt the cheese, and flip it halfway through to maintain the crispiness of the bread. Avoid using the microwave as it can make the bread soggy.
Recipe Troubleshooting Guide
Too Dry
Problem: If your sandwich turns out too dry, it may be due to overcooking or not enough butter.
Solution: Ensure you are using enough butter on the bread and keep an eye on the cooking time to avoid drying out the ingredients.
Not Crispy Enough
Problem: If the sandwich is not crispy enough, it may not have been cooked at the right temperature.
Solution: Increase the heat slightly and make sure the bread is well-buttered. Cooking it longer at a moderate heat will also help achieve that desired crispiness.
Overcooked
Problem: If the sandwich is overcooked, it can become too hard or burnt.
Prevention: Be attentive to the cooking time and reduce the heat if you notice the bread browning too quickly. You want a golden brown color, not dark brown.
Undercooked Center
Problem: An undercooked center indicates that the sandwich was cooked too quickly.
Recovery: Lower the heat and cover the skillet to allow the cheese to melt without burning the bread. Give it a little more time if the center feels cool.
Burnt Exterior
Problem: A burnt exterior can happen if the pan is too hot.
Prevention: Always start at medium heat, and adjust as necessary. If you notice burning, reduce the heat immediately.
Flavor Balance
Too Sweet: If the sandwich is too sweet, consider adding a pinch of salt or a zesty pickle on the side.
Too Salty: If it’s too salty, balance it with a bit of sweetness by adding honey or a sweet sauce.
Bland: If the flavor is bland, increase the spices used in the butter mixture, like garlic powder or black pepper.

Essential Ingredients for Crispy Grilled Ham Sandwich
Key ingredients for this sandwich include high-quality sliced ham and cheese, along with fresh bread. The choice of bread can greatly influence the overall texture and flavor. Sourdough or whole grain options add a nice chewiness, while white bread offers a classic taste.
Using fresh ingredients ensures a delicious sandwich. Look for ham that is minimally processed and cheese that melts well. Quality butter is also essential for achieving that perfect golden crust.
Essential Ingredient Notes
- Sliced Ham: Opt for a good quality ham that is not overly processed. Look for options with a natural flavor and minimal preservatives for the best taste.
- Cheese: Choose a cheese that melts well, like Swiss or cheddar. For added flavor, consider using a combination of cheeses to enhance the taste profile.
- Bread: Select a hearty bread that can hold up to the filling without falling apart. Toasting the bread not only adds flavor but also helps to prevent sogginess.

Step-by-Step Cooking Process
The cooking process for the Crispy Grilled Ham Sandwich is straightforward and allows for creativity. Start by preparing your ingredients, ensuring that everything is ready to go before you heat your skillet. Assembling the sandwich is quick, and you can customize it with your favorite toppings.
Cooking at the right temperature is key to achieving the perfect crispiness. Keep a close eye on the sandwich as it cooks, allowing the cheese to melt and the bread to achieve that beautiful golden crust. This method showcases the flavors and textures brilliantly.
Key Technique for Perfect Crispy Grilled Ham Sandwich
The most important technique for this sandwich is the buttering of the bread. A generous amount of butter on the outside of the bread creates a crispy crust while protecting the inside from becoming soggy. Additionally, maintaining a moderate heat allows the cheese to melt thoroughly without burning the bread.
Crispy Grilled Ham Sandwich
📋 Ingredients
Main Ingredients
- 1 cup butterRoom temperature
- 1 tbsp Dijon mustardFor added flavor
- 1 tbsp mayonnaiseCreaminess
- 1 tsp garlic powderFor flavor
- 1 tsp onion powderFor flavor
For the Sauce
- 1 lb sliced hamSavory and tender
- 6 slices of breadYour choice
- 4 slices of cheeseSwiss or cheddar
- 4 tbsp butterSoftened
- 1 tsp black pepperFor seasoning
Instructions
Prepare the Bread
Spread butter on one side of each slice of bread. This will help achieve a crispy exterior.
Assemble the Sandwich
Spread Dijon mustard and mayonnaise on the unbuttered side of three slices of bread. Layer with ham, cheese, and any optional toppings like tomato or lettuce.
Top the Sandwich
Place the remaining bread slices on top, buttered side facing out.
Heat the Pan
In a skillet over medium heat, place the assembled sandwiches and cook until golden brown.
Flip the Sandwich
Carefully flip the sandwiches after about 5-7 minutes and cook the other side until crispy.
Melt the Cheese
Cover the skillet with a lid briefly to help melt the cheese.
Slice and Serve
Once both sides are crispy and the cheese has melted, remove from skillet, slice in half, and serve with pickles.
Garnish
Garnish with fresh parsley if desired before serving.
Recipe Notes & Tips
Storage Tips
Store any leftover sandwiches in an airtight container in the refrigerator. If properly stored, they can last for up to 2-3 days. Reheat in a skillet to restore crispiness before serving.
Serving Suggestions
Serve the Crispy Grilled Ham Sandwich with a side of potato chips, coleslaw, or a light salad for a balanced meal. Tomato soup is an excellent accompaniment for dipping.
Recipe Variations
Feel free to customize this recipe with your choice of cheeses or add ingredients like avocado or jalapeños for extra flavor. You can also try different types of bread such as rye or whole grain for added texture.